On this tutorial, I’ll stroll you thru the method of constructing an 5-inch FPV drone with analog FPV methods. It’ll cowl all the pieces from deciding on the proper elements, to wiring and meeting, and even share insider suggestions and tips to make sure you have a dependable and fulfilling FPV drone expertise.


Mastering the Fundamentals
Earlier than entering into this tutorial, it’s essential to have a fundamental understanding of what an FPV drone is, try our newbie’s tutorial: https://oscarliang.com/fpv-drone-guide/.
As you delve deeper into the world of FPV drones, you’ll encounter varied acronyms and technical jargon. Don’t let these phrases intimidate you! Merely seek advice from our complete glossary: https://oscarliang.com/fpv-dictionary/.
With these sources at your fingertips, you’ll be effectively in your technique to turning into an FPV drone aficionado very quickly.
Components Listing
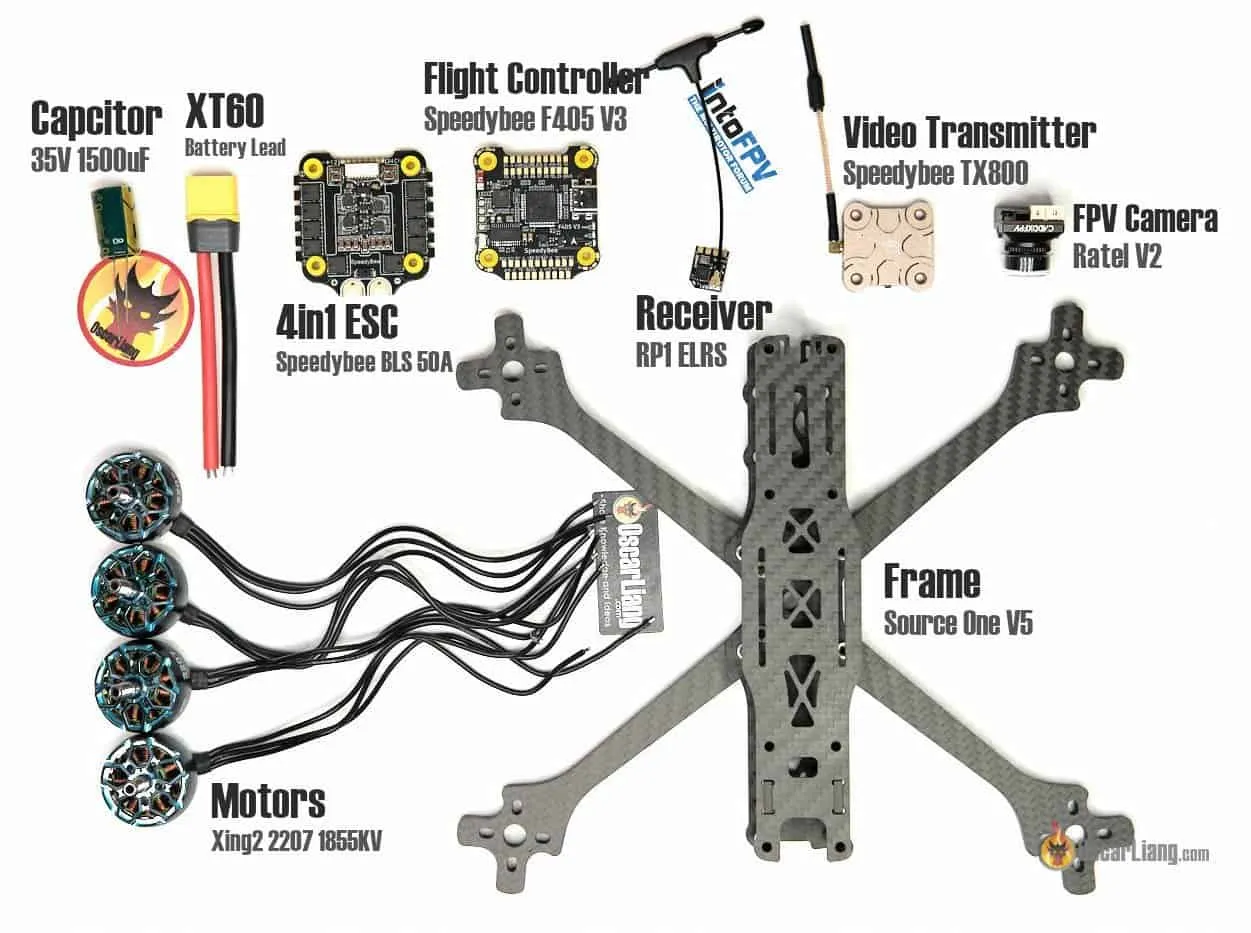
On this tutorial, we’ll be utilizing the next elements to construct our drone. I need to make it clear that the hyperlinks offered are affiliate hyperlinks. Making a purchase order by means of these hyperlinks received’t value you something additional, however it’s going to present me with a small fee. This assist helps maintain this weblog operating and permits me to proceed sharing my ardour for FPV drones with you.
On this construct, I’ll deal with analog FPV setup, if you wish to study DJI O4 Professional setup, try this construct log: https://oscarliang.com/how-to-build-fpv-drone/
In case you have a small finances, right here is a listing of the most affordable 5″ drone elements in 2025.
If you’d like extra choices, right here is a listing of elements that I like to recommend.
Important Instruments and Provides
Other than the elements we’ve talked about above, you’ll additionally want instruments and provides. Chances are you’ll have already got a few of these gadgets, however they are often simply present in your native ironmongery store or on-line if you happen to don’t have them:
For these actually passionate in regards to the interest, right here’s a complete listing of instruments that you could be discover invaluable in your FPV drone-building journey: https://oscarliang.com/fpv-tools/
Body

A body is a sturdy construction that holds all of the elements.
For this tutorial, I’ve chosen the TBS Supply One V5 body, a superb selection as a consequence of its affordability and open-source nature. The design has advanced over time, due to fixed updates from the devoted group, guaranteeing compatibility with present {hardware}, and optimizing efficiency and usefulness. Take a look at my detailed overview of the TBS Supply One V5 body right here.
One other nice benefit of the Supply One is the plethora of free 3D printing designs accessible on Thingiverse. These designs mean you can improve and customise your FPV drone construct even additional.
One other good choice could be the Axisflying Manta 5 SE, barely costlier however with further equipment it’s value each penny: https://oscarliang.com/axisflying-manta-5-se-analog-bnf/
FC and ESC

When shopping for flight controller and ESC, attempt to get them as a “stack”, which incorporates each a flight controller board and a 4in1 ESC board. Getting them collectively means they’re plug and play proper out of the field, simplifying wiring and soldering. Additionally it’s often cheaper to purchase them collectively reasonably than individually.
For this tutorial, I’ve opted for the Speedybee F405 V4 stack, because it’s among the finest worth stacks available on the market in 2025. It boasts an array of options, together with built-in Bluetooth for Betaflight configuration through your telephone, and far more! Take a look at my in-depth overview of the Speedybee F405 V4 right here. If it’s out of inventory, listed here are different choices that additionally work.
Motors

Whereas widespread motors of comparable sizes typically have comparable efficiency, the important thing differentiator usually lies of their construct high quality. For a 5″ FPV drone, motor sizes equivalent to 2306, 2207, and 2208 are all viable choices – right here’s an evidence of why I’ve chosen 2207 for this tutorial.
One other essential issue to contemplate is motor KV, which is decided by battery voltage. For 6S LiPo, the really helpful motor KV values starting from 1600 to 2000, with increased KV values offering higher efficiency however are typically extra energy hungry. On this construct, we’re utilizing 1855KV motors, as I plan to make use of 6S LiPo battery. Whereas 4S builds are additionally widespread, I personally favor 6S over 4S for these causes.
Listed here are my motor suggestions if you wish to discover different choices: https://oscarliang.com/motors/#Suggestions
FPV Setup
On this tutorial, we’ll cowl the set up and setup for analog FPV system. Needless to say there are different FPV methods accessible, try my purchaser’s information if you happen to nonetheless can’t determine: https://oscarliang.com/fpv-system/
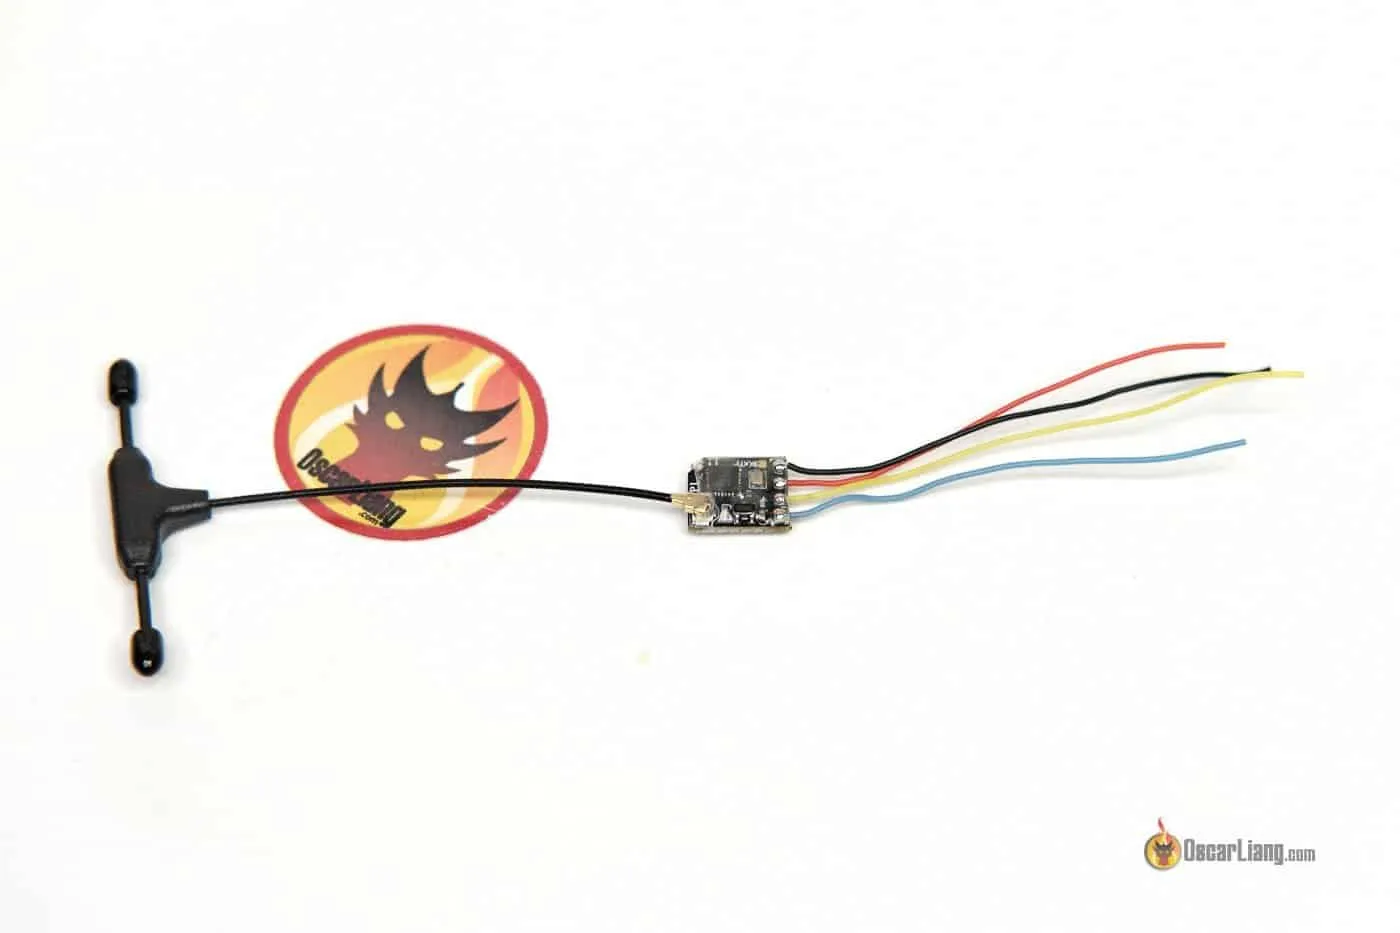
For the analog construct, we’ll be utilizing the Speedybee TX800, an inexpensive and high-performance VTX that simply mounts within the Supply One body. If it’s unavailable to you, listed here are different VTX choices I like to recommend.

Radio Receiver

Your selection of radio transmitter dictates the kind of receiver (RX) you should use. If you happen to adopted my radio suggestions, your radio ought to assist ExpressLRS, which is at the moment my best choice for a radio hyperlink in 2023. ExpressLRS is inexpensive, high-performance, and extremely dependable! Learn my article on why I like ExpressLRS to be taught extra.
Quite a few producers produce receivers and transmitter modules for ExpressLRS. You may select any of those, and so long as they’re ExpressLRS, they’ll work collectively. For this tutorial, I’ve chosen the Radiomaster RP1 receiver, which I’ve been utilizing for a number of months now. It delivers wonderful efficiency and has constantly remained in inventory.
That can assist you arrange ExpressLRS, I’ve put collectively a step-by-step tutorial.
To fly a quadcopter in FPV, you’ll want the next equipment. Check out my on a regular basis gear for inspiration. Here’s a abstract:
Miscellaneous Provides:
-
- soldering iron
- solder flux
- solder wire
- Hex screwdriver set (will need to have sizes are 1.5mm, 2.0mm and a couple of.5mm)
- Thread locker (really helpful – for securing motor screws)
- 2mm zip ties (for securing wires and elements to the body)
- double sided foam tape (optionally available – for securing elements to the body)
- Fabric tape or electrical tape (optionally available – for securing motor wires)
- multimeter or/and VIFLY ShortSaver V2 (for security checks earlier than plugging in battery for the primary time)
- wire strippers (you could get away with a pair of scissors)
- 28AWG silicone electrical wire (for soldering elements to the FC)
- Battery pad (optionally available)
- Propeller nut instrument (optionally available)
For different FPV Drone elements that I’ve examined and suggest, go to: https://oscarliang.com/tag/suggest/
Steps of Constructing FPV Drone
Click on the hyperlink will take you to the part on this article:
1. Body Meeting
Earlier than constructing, it’s a good suggestion to organize the body, though this step is optionally available:
- Sand down the sharp edges on carbon fibre items, significantly on the outer aspect of the arms and plates. Sharp edges may minimize your wires and battery strap in a crash. Chamfered edges also can assist cut back the probability of carbon fibre sheet delamination in crashes.
- Wash all carbon fibre elements in soapy water to take away any remaining carbon mud from reducing, drilling, and sanding (take into account that carbon fibre is conductive). Then, dry the elements totally with a towel.
To assemble the body, begin by positioning the arms and arm lock on prime of the entrance backside plate.
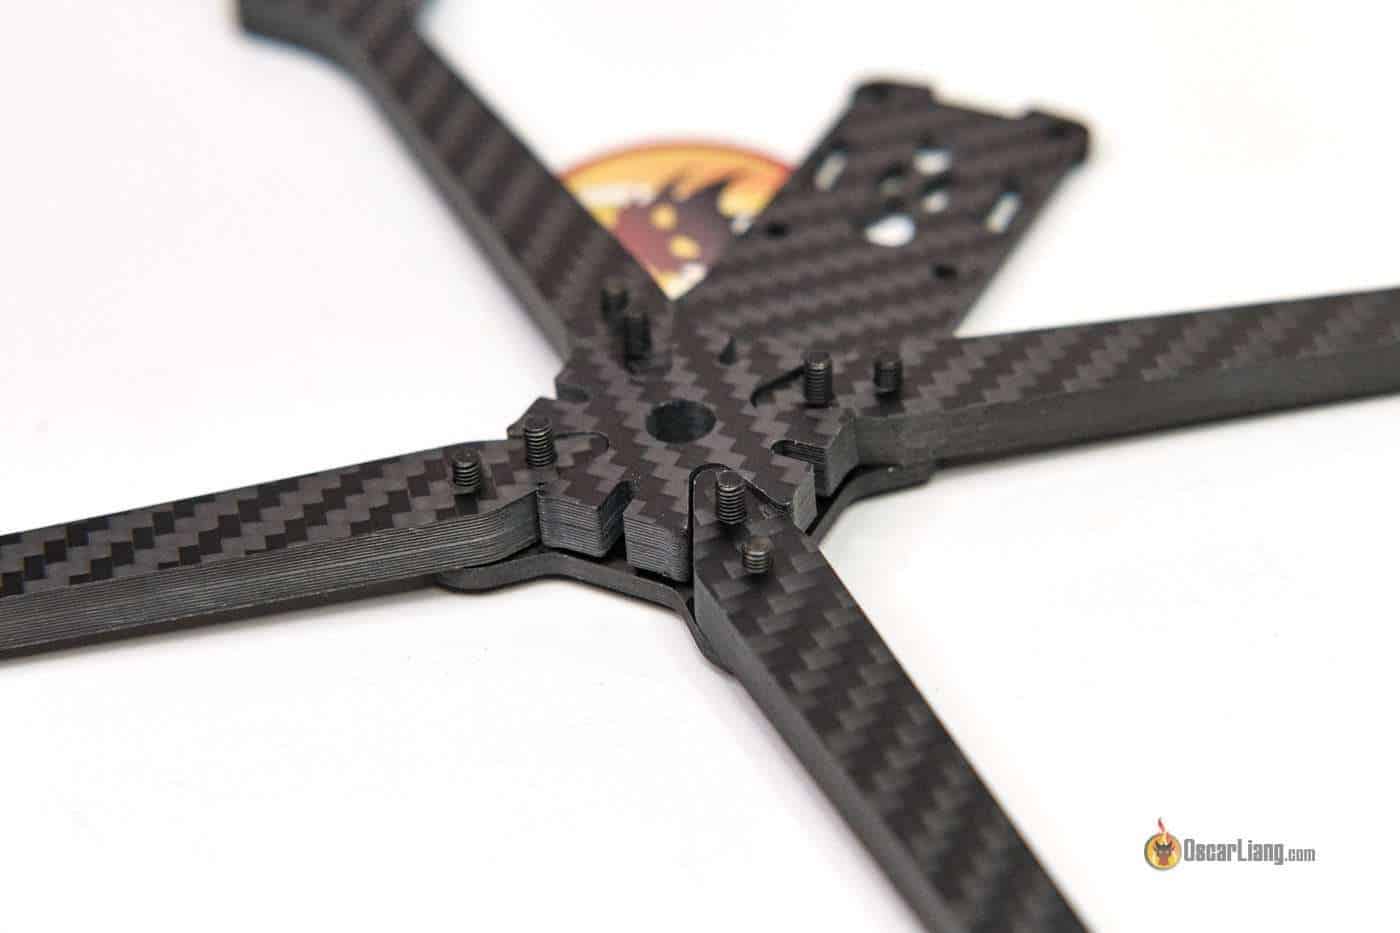
Subsequent, place the rear backside plate (which has push nuts) on prime of the arms, and fasten it with screws from the underside. Lastly, set up the eight aluminium standoffs, however be aware of their totally different heights – the 4 entrance standoffs are longer.

2. Putting in Motors
Now, it’s time to mount the 4 motors to the arms. It’s really helpful to make use of threadlock on the motor screws, as vibrations from the motors may cause screws to loosen over time. Thankfully, the screws that include the Xing2 motors have already got threadlock utilized, so there’s no want for added software.

The arms are 6mm thick, making the 8mm screws the right size. There’s no want to make use of washers.

If you happen to’re utilizing strange screws, you should definitely get some Loctite (thread locker). Go for the blue liquid sort, because the purple liquid sort is designed for everlasting use and may make eradicating the screws later fairly troublesome.
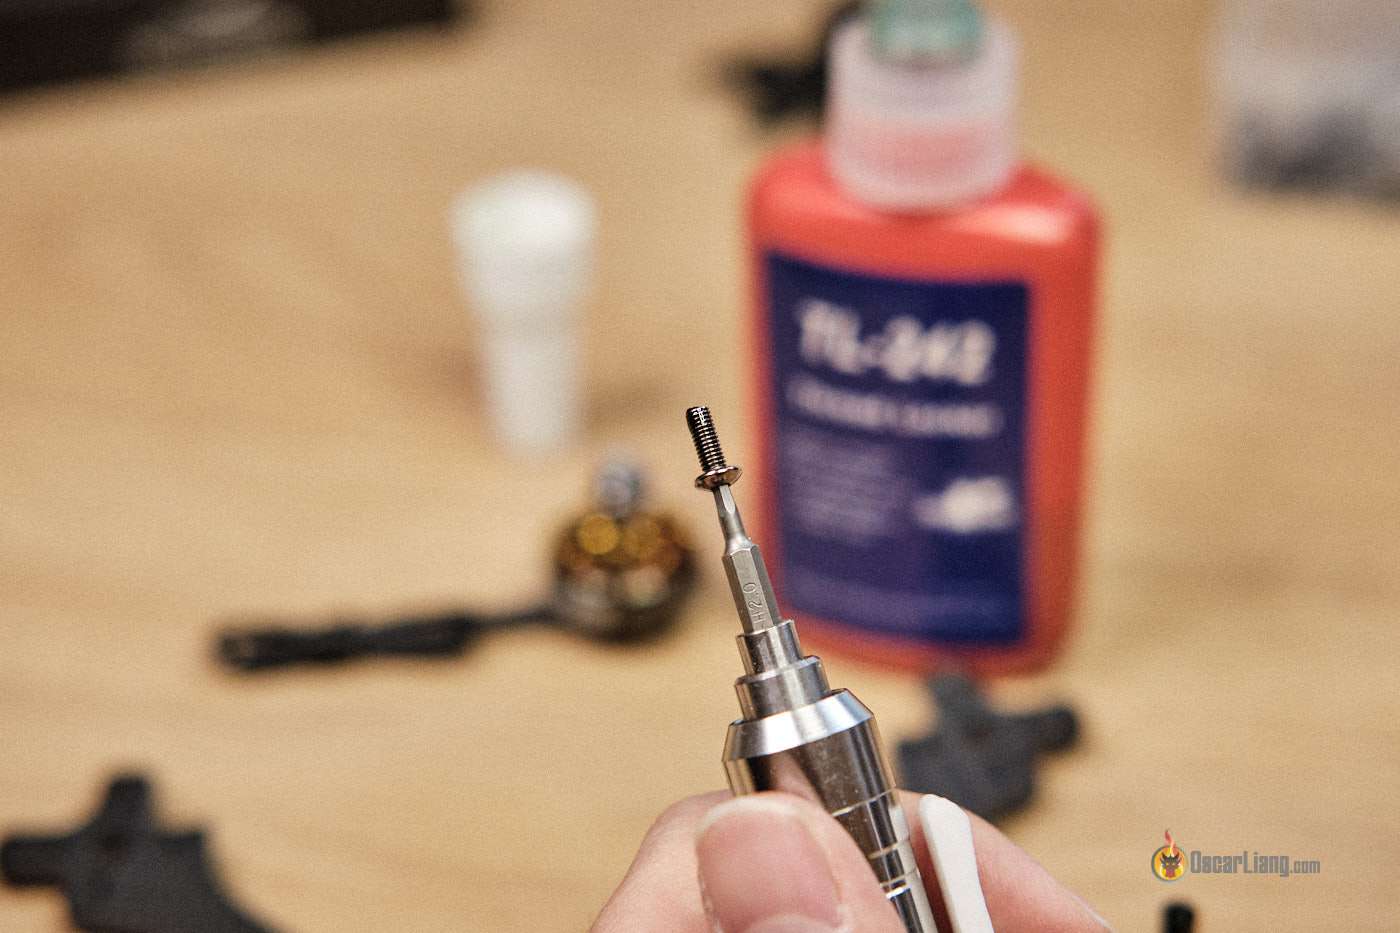
Lastly, make sure the motor screws aren’t too lengthy and touching the motor winding. If you happen to’re unsure in regards to the screw size, observe this information on how one can verify in case your motor screws are too lengthy.

3. Wiring Diagrams
Earlier than continuing, it’s a good suggestion to create a wiring diagram on a chunk of paper outlining how one can join all of the elements. If you happen to’re utilizing the elements I really helpful, listed here are connection diagrams you may observe.
For the Analog construct:

Earlier than soldering any wires, you may “dry match” all of the elements within the body. This course of means that you can gauge wire lengths, decide part placement, and establish any potential spacing points.

4. Putting in ESC
Start by changing the 4 shorter screws within the body with the lengthy M3 30mm bolts that include the Speedybee F405 V3 stack. Keep away from utilizing nylon standoffs for putting in FC, ESC and VTX, they break simply in crashes. Use metallic bolts as a substitute.
Use metallic bolts for putting in stack (with a metallic nut on the botttom), it reduces vibration and wobble, makes the drone fly higher and simpler to tune.
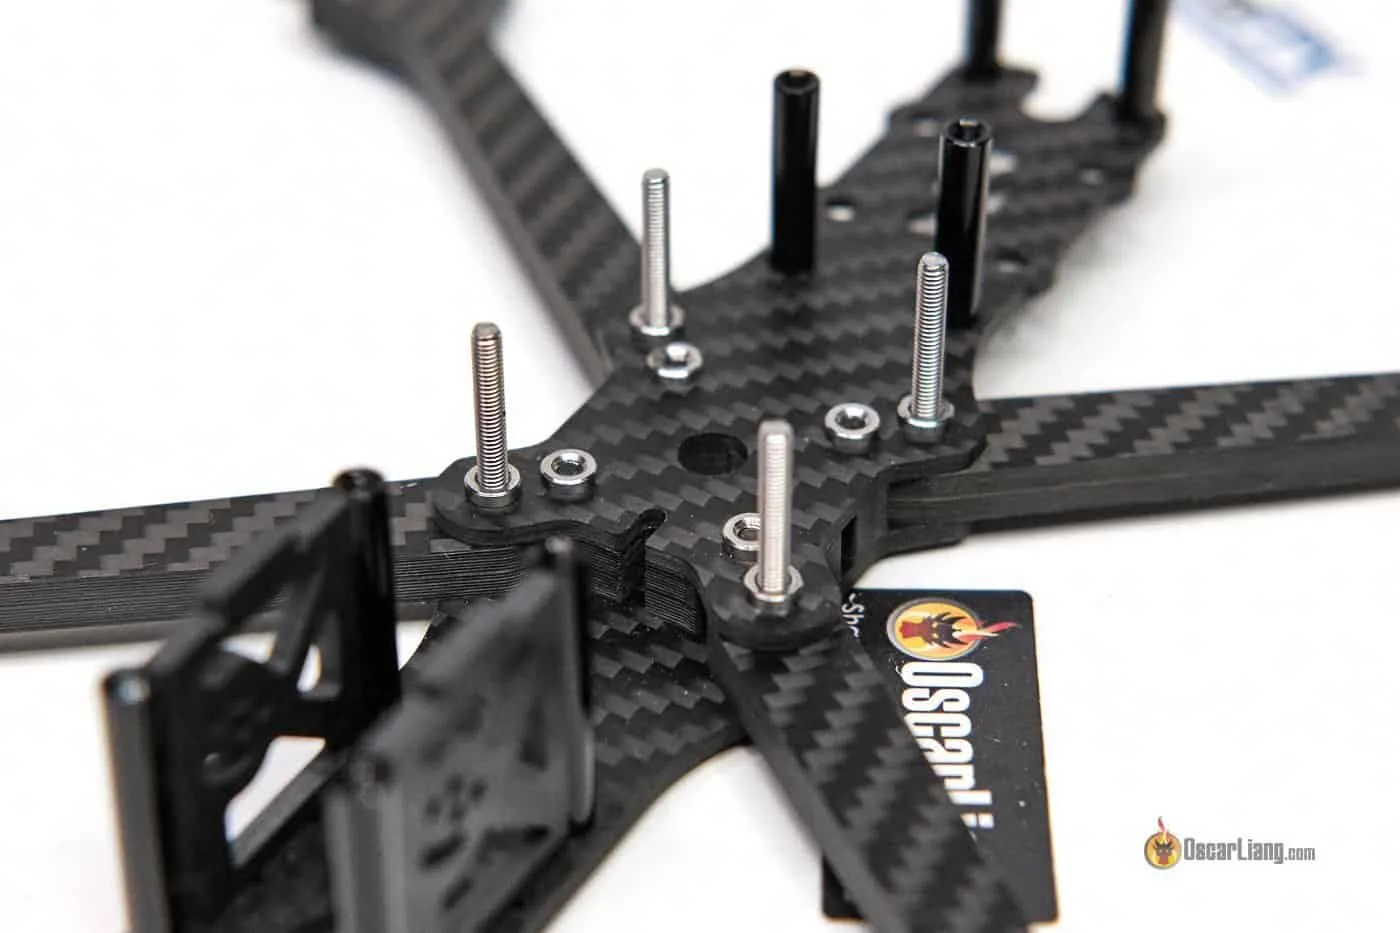
Slide the 4in1 ESC and FC boards onto the 4 lengthy screws, guaranteeing the ESC board’s energy pads face backward and the motor solder pads face up. The entrance of the body is identifiable by the cut-outs for the digicam mounting plates.

Examine the underside of the ESC to make sure it’s not touching the body. Moreover, verify for any contact between the ESC and FC.

Subsequent, you’ll do some soldering. If you happen to’re new to soldering, seek advice from the tutorial “Find out how to Solder for Freshmen“.
Decide the required motor wire lengths, leaving just a little slack, and minimize them accordingly. Safe the motor wires on the arms with fabric tape or electrical tape.
Some individuals like to make use of braided mesh tubes over the motor wires for cover/aesthetics functions. Personally I don’t use them, they’re a ache to put in and so they don’t actually present a lot safety or advantages.

Then, strip about 2mm off the tip of the wires and tin the ends.

Utilizing the trimmed off motor wires, solder two of them to the enter energy of the ESC (ideally on the underside aspect). Mark the optimistic wires with a chunk of tape to solder the capacitor to later. You may also use any 20AWG or 22AWG silicone electrical wires.

Tin all of the solder pads on the 4in1 ESC. To stop solder from by accident dropping onto the elements and inflicting electrical shorts, cowl the areas of the board the place you’re not soldering with tape, equivalent to electrical tape, kapton tape, or masking tape.

Solder the motor wires onto the ESC. Don’t fear about wire order and motor path but; you may change this later within the software program. In case you have the abilities, you might attempt to solder motor wires aspect manner, make it nicer to seize the quad.
Solder the XT60 energy result in the ability pads on the ESC, ensuring to keep up the right polarity (optimistic and unfavorable). This step could also be difficult because of the quantity of warmth required to soften the solder on the massive copper pads. Be affected person and use a better temperature in your iron.
Soldering Ideas:
- Use a great quantity of solder and solder flux (solder paste) for the massive pads, guaranteeing the solder joints are shiny and full. If you happen to can see the wire strands, you haven’t utilized sufficient solder.
- Apply extra flux if the solder “sticks” to the tip once you take away it from the joint.
- Be at liberty to make use of a excessive temperature when soldering massive solder pads, however be fast and keep away from overheating the pads for too lengthy. Use 450°C (840°F) for motor wires and XT60, and 380°C for sign wires.

Now solder the 1500uF capacitor that comes with the Speedybee stack. Bend and shorten the legs with pliers, then tin them with solder.

Apply a small piece of double-sided tape to the underside of the capacitor.

Solder the capacitor to the wires linked to the ESC energy pads earlier, being aware of the polarity. The aspect with yellow marking is the unfavorable aspect of the capacitor.

A capacitor is used to scale back voltage spikes and electrical noise generated by the ESC and motors. It may well additionally assist when bent props create extra noise. To be taught extra about why including an additional capacitor to FPV drones is beneficial, see this put up.
Lastly, join the FC to the ESC utilizing the offered 8-pin ribbon cable. When putting in the flight controller on prime of the 4in1 ESC, make sure the arrow on the FC factors ahead.
5. Testing ESC and Motors
Earlier than plugging in a LiPo battery for the primary time, guarantee there aren’t any electrical shorts. Utilizing a multimeter in continuity mode, take a look at the optimistic and unfavorable terminals of the XT60 (or instantly on the solder pads). If there’s a brief circuit, the multimeter will beep repeatedly. On this case, don’t plug within the battery, as it might injury your elements. As a substitute, troubleshoot and repair the problem that’s inflicting the brief circuit.
For extra info on utilizing a multimeter to check your drone, try this tutorial.
Professional-Tip: A brief beep adopted by silence could happen when testing continuity as a consequence of capacitors charging. That is regular and shouldn’t trigger concern. So long as it stops beeping after a second or two you need to be effective.

Use a smoke stopper when plugging in a battery for the primary time. Whereas not obligatory, it’s a really helpful funding to keep away from damaging elements.

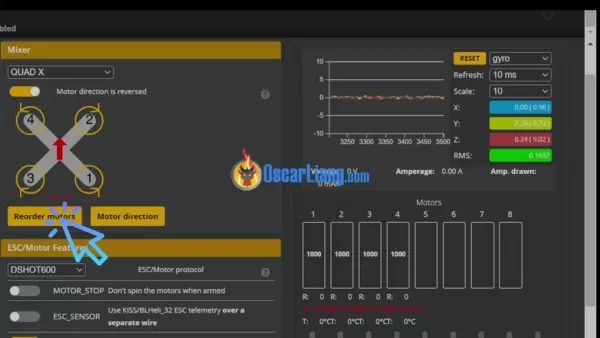
Don’t set up propellers but. To check the motors, plug within the battery and join the USB cable to the flight controller. Within the Motors tab of the Betaflight Configurator, spin up the motors one after the other (transfer the slider to round 10%) and confirm if they’re spinning within the appropriate path.

To reverse a motor spinning within the unsuitable path, use the Betaflight Configurator (Motors tab) as defined right here.
Additionally be certain that the spinning motor quantity matches the diagram, e.g. motor #1 is the rear proper, motor #2 is entrance proper and so on.

If the motor order is unsuitable it’s worthwhile to repair it utilizing the “Reorder Motors” instrument within the motors tab, and following the directions. You may also repair it utilizing CLI instructions however it’s much more difficult, simply use the instrument 🙂
Troubleshooting suggestions:
- If motors aren’t spinning, make sure the battery is linked. And the ESC ought to beep as quickly as you plug within the battery. Be certain the ESC is linked to the FC, and that the pin connections are appropriate.
- If all motors spin aside from one, that specific ESC, motor, or the ESC sign from the FC could be defective. To troubleshoot, swap the non-functioning motor with a working one on the identical quad to find out if the problem lies with the ESC or motor.
For additional help, ask within the discussion board: https://intofpv.com
6. Receiver Setup
To solder the RX to the FC, you’ll want your personal 28AWG or 30AWG wires, because the RP1 doesn’t include them: https://oscarliang.com/wires-connectors/
Mount the RX in entrance of the FC utilizing double-sided foam tape or a zipper tie. You may mount it anyplace with sufficient area within the body.
It’s greatest to maintain the highest of the FC away from any wires, keep away from operating wires on prime or subsequent to the gyro which may trigger vibration throughout flight.

Safe the RX antenna underneath the closest arm with zip ties and wrap the antenna wire with tape to stop it from getting caught.

Bind the receiver to the radio (TX module) following the information on organising ExpressLRS. Within the Betaflight configurator, apply these configurations:
- Go to the Ports tab and allow “Serial RX” for the UART linked to the receiver (UART2 in our instance).
- Within the Receiver tab, choose “Serial (through UART)” in Receiver Mode and select “CRSF” in Serial Receiver Supplier.
After this, verify that the receiver is working correctly within the Receiver tab. The bars (channels) ought to transfer once you transfer the sticks on the radio. If the unsuitable channels are responding, strive a distinct Channel Map equivalent to “default (AETR)” or “TAER.”

Arrange at the very least two switches on the radio (directions) for arming and beeper. You may additionally desire a third change for flight mode (e.g., angle mode). Verify that these switches work within the Receiver tab, with AUX1 and AUX2 responding once you flip them.
For any questions, put up within the discussion board: https://intoFPV.com
7. Putting in Analog FPV Setup
Set up the digicam between the aspect plates.

Place the digicam contained in the body and minimize the digicam wires to size. Twist the wires to maintain them tight.

Solder the digicam wires to the FC: Purple goes to 5V, black goes to GND, and yellow goes to CAM.

For putting in the VTX, take into account simply utilizing double sided tape and zip tie, as a substitute of utilizing standoffs. It’s simple, safe and weight saving if you happen to don’t care how your quad look and simply performing effectively.
Apply double-sided foam tape to the underside of the VTX, guaranteeing that it covers any copper to stop contact with the body when mounted.

Insert 2mm zip ties by means of the mounting holes and tighten. Concurrently tighten down the battery leads.

That is the way it seems to be from the underside of the body.

Solder the VTX cable to the FC and ensure it doesn’t dangle round.

Strap the VTX antenna to the standoff.

To setup the VTX in Betaflight, go to the Ports tab and, for the UART that you’ve linked the IRC pad to, choose IRC Tramp underneath Peripherals.
Copy the VTX Desk snippet beneath into the CLI for the Speedybee TX800. It will allow you to alter VTX settings within the OSD menu.
# vtxtablevtxtable bands 5vtxtable channels 8vtxtable band 1 BOSCAM_A A CUSTOM 5865 5845 5825 5805 5785 5765 5745 5725vtxtable band 2 BOSCAM_B B CUSTOM 5733 5752 5771 5790 5809 5828 5847 5866vtxtable band 3 BOSCAM_E E CUSTOM 5705 5685 5665 0 5885 5905 0 0vtxtable band 4 FATSHARK F CUSTOM 5740 5760 5780 5800 5820 5840 5860 5880vtxtable band 5 RACEBAND R CUSTOM 5658 5695 5732 5769 5806 5843 5880 5917vtxtable powerlevels 5vtxtable powervalues 25 200 400 600 600vtxtable powerlabels 25 200 400 800 800save
8. Ending Off
To finish your drone construct, observe these steps.
Safe FC with nylon nuts, fasten along with your fingers to keep away from over-tightening, they need to simply contact the rubber grommet. Compressed grommets cut back vibration damping and defeat the aim of sentimental mounting.


Strap the capacitor to the digicam plates utilizing a zipper tie.

Set up the highest plate and thread a battery strap underneath and thru it. The Supply One V5 comes with a rubbery battery pad that works effectively, however if you happen to favor a top-notch choice, take into account the Ummagrip battery pad. It’s sticky, washable, and its thickness retains your battery safely away from the bolts.

The weights of the completed drone are as follows:
- Drone: 360g
- Drone + 6S 1100mAh LiPo: 560g
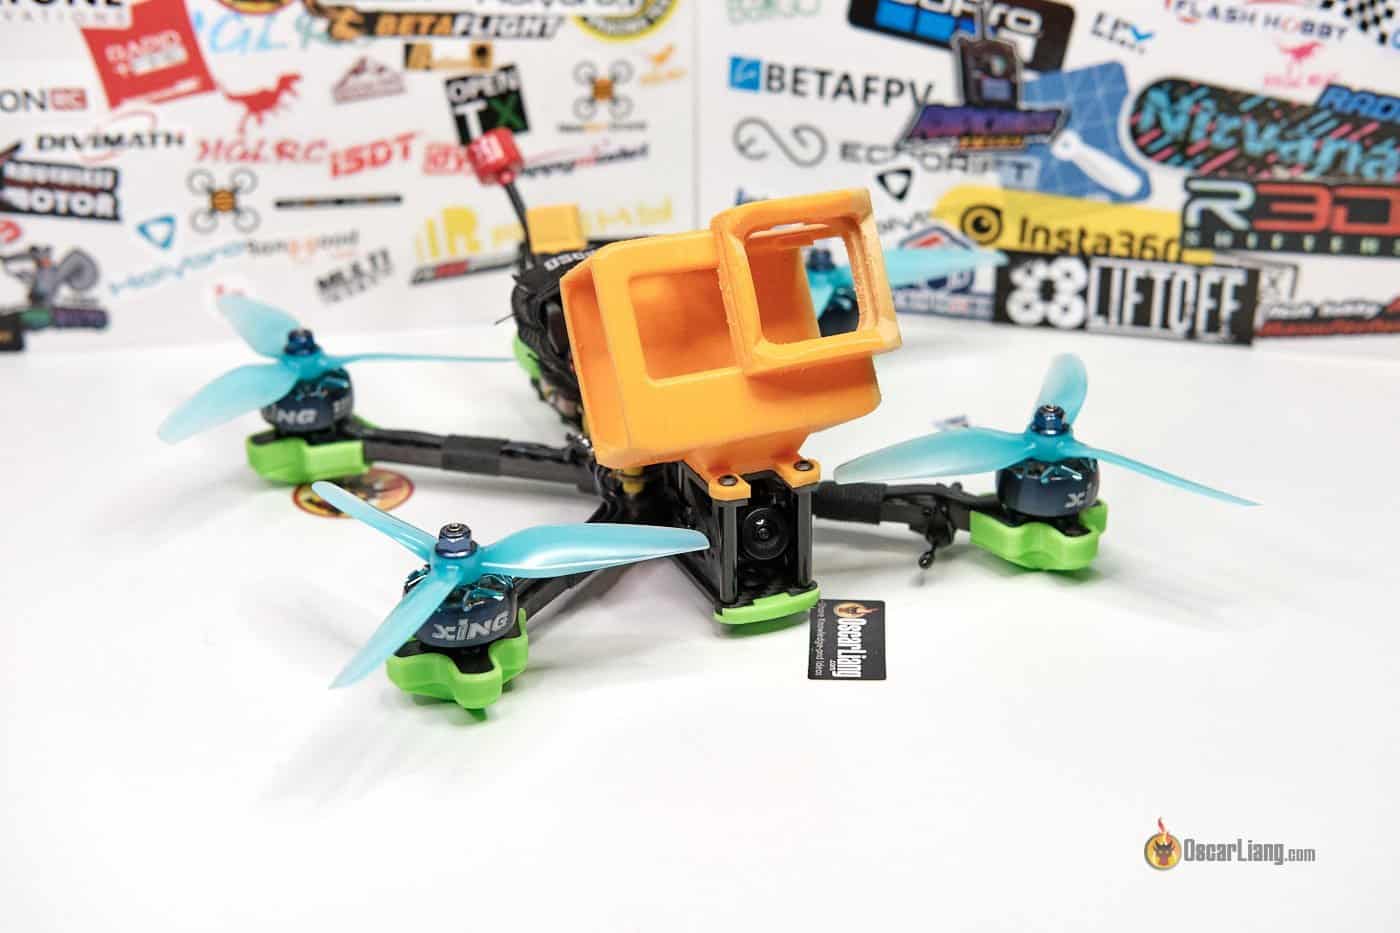
- Drone + 6S 1100mAh LiPo + GoPro 7: 680g
That is really actually gentle for a 5inch and that ensures nice flight efficiency. As a rule of thumb, keep away from exceeding 750g with a 5inch together with battery and gopro in any other case it flies like a tank and don’t really feel good for freestyle.

When putting in the propellers, take note of the totally different rotations—CW (clockwise) and CCW (counter-clockwise). Guarantee they’re put in on the right motors; in any other case, your quad could not take off or may flip over when making an attempt to.

Use M5 nylon lock nuts to carry the propellers securely on the motor. Tightening could be difficult at first however will develop into simpler over time. Keep away from overtightening to stop prop hub shattering. Tighten simply sufficient so the prop can’t transfer once you attempt to rotate it along with your hand whereas holding the motor bell.
A devoted prop nut instrument can pace up prop modifications.

When mounting the battery (and GoPro), make sure the COG (heart of gravity) is as near the drone’s heart as attainable. To verify if the battery is positioned accurately, seize the center of the highest plate with two fingers and see if the quad stays stage.
It’s important to keep up the COG on the heart of the 4 motors. If the quad is front-heavy, the entrance motors will work more durable than the rear motors to keep up a stage place, negatively impacting flight efficiency.

And we’re prepared for a take a look at flight!


9. Utilizing 3D Printed Components
For a cleaner, sleeker, and extra sturdy construct, think about using 3D printed elements. Yow will discover varied designs on-line by looking for “Supply One V5” on Thingiverse.com. Components for different frames may additionally work on the Supply One. One really helpful supply for 3D printed elements is https://3dprintsfpv.co.uk/. If you happen to can’t discover the elements you need of their store, ship them a message with the Thingiverse hyperlink and the filament coloration you need, I’m positive they’re pleased to assist.
Listed here are some good ones I discovered:

One of the vital quick and visually obvious modifications I like to recommend is the addition of 3D printed arm protectors. These should not simply ornamental; they serve a vital position in preserving the integrity of the carbon fiber arms. With out them, the arms are vulnerable to splintering on the ends upon affect. The great thing about 3D printed arm protectors lies of their capability to soak up and distribute shock, considerably decreasing the danger of harm.
Additionally they defend the motors throughout crashes. These guards can forestall bending of the motor shafts and defend the motor bells from dents and scratches, which might have an effect on efficiency.
To make use of arm guards, you could want longer motor screws, equivalent to M3 10mm.

Within the analog construct, utilizing a 3D printed antenna mount means that you can make the most of the MMCX to SMA extension cable that comes with the TX800 and improve the VTX antenna to a round polarized one for higher sign high quality.

3D printed elements will also be used to mount the digicam and capacitor.

10. Setting Up Betaflight

To arrange Betaflight to your first flight, observe the directions on this information: “how one can setup Betaflight for the primary time“.
11. Tuning
Tuning your quadcopter includes adjusting it to fly and behave the way in which you need. Betaflight has come a good distance; you don’t need to tune your quad, and it’ll possible fly simply effective with inventory settings. Nevertheless, if you happen to’re critical about efficiency, there’s extra to be taught!
For most individuals, tuning a mini quad includes adjusting these settings:
If you happen to don’t know how one can use Blackbox, that is how one can tune your FPV drone in 10 easy steps. If you happen to’re aware of Blackbox, try this in-depth information on tuning filters and PID.
The next is my PID and Filter tune for this construct, however it won’t work effectively for you if you happen to’re utilizing totally different elements. It’s an aggressive tune, so carry out a brief take a look at flight and verify your motor temperature earlier than utilizing it. It’s extremely really helpful to tune your construct from scratch following this information.


My charges for freestyle are (Precise Price):
- Middle Sensitivity 180
- Max Price 750
- Expo 0.56
12. Studying Find out how to Fly
In case you have little to no expertise flying a mini quad, take into account trying out these tutorials to get began:
In case you have any questions, be happy to ask within the feedback.
You may verify my previous construct guides from 2020 and 2018:
Enhancements and Upgrades
When you’ve mastered the fundamentals of constructing and flying your FPV drone, you could take into account making some enhancements and upgrades to reinforce its efficiency. Right here’s a listing of potential upgrades and enhancements you may make:
These upgrades and enhancements will make it easier to get probably the most out of your FPV drone and improve your general flying expertise. Keep in mind that as you develop in talent and data, there are all the time new methods and applied sciences to discover on this planet of FPV drones.